Showing posts with label Recipe. Show all posts

2016/04/19

Savoury Cheese Muffins

[J.] It seems like I am really getting into the cooking or baking at the moment. I am not sure yet if cooking really is something I will ever be absolutely passionate about. I think that I am enjoying it so much at the moment because of the cold and rainy weather we are experiencing here in Buenos Aires since our arrival. It is not even that cold, but cloudy, windy and miserable most of the time and hence, not really a lot of fun to walk around and explore this city. And in order to kill some time, I started this baking or cooking thing. Also, the recipes are very simple, quick and it is no problem if one does not get the amount of the ingredients or the oven temperature hundred percent right...
Yesterday evening, we had planned to finish most of the left overs from the previous days, but then we also felt the urge for something freshly made. And that's where the savoury muffins came in...

Ingredients for Savoury Cheese Muffins (as per the Edmonds Cookery Book):
1 tablespoon chopped celery
1 tablespoon chopped red or green pepper
3/4 cup grated tasty cheese
2 cups plane flour
Pinch of cayenne pepper
4 teaspoons baking powder
1/4 teaspoon salt
1 egg, beaten
50 g butter, melted
1 1/2 cups of milk

Put celery, pepper and cheese into a bowl. Sift flour, cayenne, baking powder and salt into the bowl. Stir to combine. Quickly stir in egg butter and milk just to moisten.
Spoon mixture into greased muffin tins. Bake at 200C for 15 minutes or until golden.
Makes 12.

Et voila!
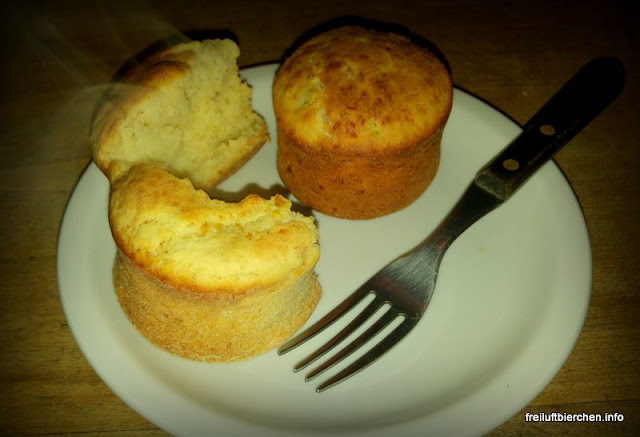
The muffins were really tasty and we had them for dinner fresh out of the oven. They were moist and soft / sponge-like. Add some butter and top it with salami or ham; it was sooo delicious!


Notes:
1) I altered the basic recipe in the following way:
  a) Instead of using cayenne pepper, I added a teaspoon of freshly chopped and very spicy chilli
  b) I added a teaspoon of dried herbs de Provence
2) I would recommend to use more salt than just 1/4 of a teaspoon. I used 1/2 and still felt it could have been a bit more. However, you can still sprinkle some more salt over them later while eating.
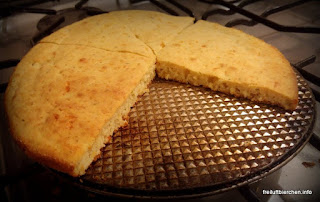
3) Due to the lack of appropriate muffin tins, I used coffee cups and poured the remaining dough into a baking tray. The latter tasted the same but was obviously not as spongy and moist as the muffins out of the coffee cups. However, husband used the 'flan'-like bread to prepare some sandwiches for our Spanish class today by slicing several pieces into half and adding cold cut, tomatoes, cheese, etcetera. Yum!

2016/04/18

(Ice-Cream) Pudding from scratch

[J.] I found a Sunday evening, especially a rainy, miserable and cold Sunday evening, is the perfect time to try a new sweet desert recipe from Edmonds Cookery Book. The recipe featuring this evening is the Ice-Cream Pudding, served chilled.
However, I think this recipe is a basic recipe for a vanilla pudding and best served warm and fresh from the stove instead of chilled. It so reminds me of my childhood, when my grandmother prepared this pudding on a regular basis for my grandfather (who really had a sweet tooth), my sister and me. It is perfect together with any kind of fruit compote or ice cream. My personal favourite is the combination of warm vanilla pudding together with cold cherry compote. Aaaah, these childhood memories are so warming my heart... Grandma, you are the best!

Ingredients for the Ice-Cream Pudding:
50g butter
1/4 cup sugar
1/4 plain flour
1 egg
2 cups milk
1/2 teaspoon vanilla essence

Cream butter and sugar until pale. Stir in flour. Lightly beat egg with a fork. Add to creamed mixture.
In a saucepan, mix creamed mixture and milk together. Cook over a low heat until mixture boils and thickens, stirring constantly. Remove from heat. Add vanilla. Pour into serving dish and chill until set.
Serves 4.

Pudding fresh from the stove!
Notes:
I altered the recipe slightly in the following way:
1) Depending on your personal preference: Add 1 teaspoon of vanilla essence instead of 1/2
2) Add a pinch of salt
3) Add a teaspoon of fresh lemon juice


In the meantime...
1) Exercised my upper arm muscles by beating the mixture with an egg whisk and thinking of how difficult cooking/baking must have been without electricity. Really wished a mixer would be available. But then, this pink whisk so deserves to be used...
2) Pudding disappeared already, straight out of the saucepan and left husband and myself with a full and happy belly. Mmmmh...

2016/04/13

Baked Apple Dumplings

[J.] While travelling around New Zealand, we were staying with a very lovely family in Wanaka, South Island. They hosted us for two nights and we had a blast preparing dinner with them: they were fun to be around, had interesting stories to share and were seriously digging into food. They shared their whole kitchen with us and well, husband made a lot of use of it. Preparing dinner or a meal together is something that I found to be one of the most rewarding activities when staying with local people and something over which it is easy to connect with people. Okay, I must admit that generally my cooking part reduces to chatting with everyone, sipping on one or more glasses of wine and maybe cutting some ingredients while everyone else actually is preparing the food. I am so not into cooking, but well... I love eating and especially, the social atmosphere when everyone is assembled in the kitchen, chatting about the world and its little stories. That also the reason why I love having a couch in the kitchen!
The second evening, our host prepared the dessert for dinner and they introduced us to what appears to be the most traditional cooking book in New Zealand: Edmonds' Cookery Book. We were told that this cooking book is THE cooking book one will find in every household of New Zealand:

A few days later, we were walking past a book store and I thought, well... let's check if our hosts were right when they said one will actually find this cooking book everywhere. And indeed! Saw the book, and tataah! - Bought it.
Now, there were two questions coming with this purchase:
A) What on earth do I want with a cooking book when I do not cook?
B) Why would I want to carry a book around for the next six months when quite likely I am not going to use it?
These were exactly the questions husband asked. I looked at him and said 'Well, you are right, but a) I simply wanna have it, and b) it will remind us of our trip around New Zealand forever!' So, the deal was that we take the book with us and I am going to bake sweet dishes on a regular basis. Sold!

Now, baking without any basic tools can be a bit of a challenge. But, there are still more then enough basic recipes in this book that do not require any electric tool (besides an oven and some basic oven-proof materials). This evening, I started off with baked apple dumplings (recipe as per Edmonds Cookery Book):

Ingredients for Baked Apple Dumplings (serving 4):
2.5 cups flour
1/2 teaspoon salt
3 teaspoons baking powder
50g butter
1 cup milk
4 medium Granny Smith apples, peeled and cored
1 cup sugar
1 cup water

Sift flour, salt and baking powder into a bowl. Cut in butter until it resembles fine breadcrumbs. Add milk, mixing to a soft dough.
Divide dough into four portions. On a lightly floured board roll out each portion of dough to a 20cm square.
Place an apple onto each dough square. Dampen edges with water. Sprinkle each apple with 1 teaspoon of the measured sugar. Carefully wrap the dough around each apple. Place apples in a greased ovenproof dish.
Put water and remaining sugar into a saucepan. Heat gently, stirring constantly until sugar has dissolved. Pour this over apples.
Bake at 190 C for 45 minutes or until pastry is golden and apples are cooked.

And that's how the dumplings looked liked:

Two apple dumplings fresh out of the oven :)
What I really liked about this recipe is that without having used any precise measurements the dumplings turned out to be totally yummy. They are like sweet bread with a sweet but fresh filling, something that I would call the perfect dessert for a cold day. Combine it with vanilla ice cream and you are in heaven.

Few notes:
1) It does not matter how the dough is wrapped around the apples, just wrap it.
2) Put the dumplings into a rather smaller but deeper dish.
3) I would say that one dumpling is easily filling one person for a meal, but then I might have used more flour and butter compared to what the recipe was indicating...

2013/08/04

Warthog Potjie with Beans and Cashew Nuts

This is my version of a Pork Vindaloo with Naan. But SA style ... because we wanted to do a Potjie on a lazy Sunday afternoon and I found a Warthog leg and shoulder at my favorite butcher here in Joburg. The meat and biltong at RM Meats is amazing and during game season they offer everything from Eland to ... Warthog.
For this recipe I combined a couple of recipes that I found on the internet. I do not think that this is a proper Vindaloo but it tasted great and I can only recommend this flavour combination.

Here are the ingredients:


Naan

400g flour
200ml warm water
3 tbs olive oil
4 tbs plain yoghurt
1 tsp sugar
1 tsp dried yeast
1 tsp salt


Warthog Vindaloo
2.5kg Leg or Shoulder
3 Onions
10 gloves garlic
Ginger (same amount as garlic)
Red and green Chili (same amount as garlic, it will help with the colour of the Potjie if you find the bigger chilis because they are much milder and you can use more of them)
35 gr. of Garam Masala
15 tsp of Rice Vinegar (White Wine Vinegar should be fine as well)


1000 gr. Tomatos

100 gr. Brown Sugar
500 gr. Dried Beans (I could not get the black beans so I took speckled beans)
500 gr. Cashew Nuts


Step 1:
Cut the Warthog leg into bite sized chuncks.
Put garlic, ginger, chilis, onios and rice vinegar in a blender and mix it until you get a fine paste.


Step 2:
Add the paste together with the garam masala and some salt to the meat. Make sure everything is properly coated and let it rest in the fridge for at least 4 hours or overnight.


Step 3:
Heat up the Potjie and add some cooking oil. Add the meat and brown it a bit (5-10 min). Then add the Tomates.You can cut them into smaller pieces but it reallz does not matter much. Add some water but do not cover the meat completely. Let it cook on low heat for two hours.


Step 4:
After two hours you can add the beans. I used speckled beans because I could not find black beans in our Supermarket. The beans had to be cleaned and soaked in water for a couple of hours. But the still need to cook properly inthe Potjie for 2.5 to 3 hours until they were soft. So overall the Potjie will take 4 to5 hours. We removed the lid for the last hour to reduce some of the liquid in the Potjie.


Step 5:
Roast the cash nuts. You can use a pan to do it but you already have a fire going so why not use it brown the nuts (and bake the naan) as well.


Step 6:
Add the nuts to the Potjie just before serving. This is how our Potjie looked like! Use salt, chili, lemon or sugar and season to your liking.


Step 7:
For the dough of the Naan mix the warm water with the sugar and the yeast and let it rest for 20 min. You should be able to see some bubbles on the surface of the water. Mix the yeast/water with the rest of the ingredients and knead the dough for a couple of minutes. Let it rest somewhere warm for at least 2-3 hours. 
Divide the dough into 4 pieces and form the naan. Use some oil to cover the naan and bake it on the fire for 5 minutes on each side.

Enjoy!

2013/04/21

Impala-Liver paté

We spent the Easter weekend in a place called Biki Bini Bos near Rustenburg. It is a lovely place, very quiet and the owners Martie and Pieter and their family are the nicest hosts you will ever meet. On the day we left they even offered the liver of an Impala to me that they shot in the morning ...

So here is my recipe for liver paté - it works with any kind of liver of course but Impala liver has a very nice taste indeed.

Ingredients
400 gr. Liver
110 gr. Butter (warm)
1 small onion
50 gr. fresh cream
a shot of Brandy
1 bay leaf
2-3 juniper berries
fresh thyme


Cut the liver into 2-3 cm thick slices. Roughly chop the onion. Crush the juniper berries in a mortar.

Take some of the butter and put it a frying pan together with the bay leaf, the juniper berries, the onion and the thyme. 


When the butter is really put some slices of the liver in the pan. Not all at once or else the temperature of the pan will drop to much to sear the liver properly.


The liver will take about 3-5 minutes to cook properly. Do not leave it in the pan too long or else the liver and the paté will be grey which you do not want. You can feel if the liver is just about right by how firm it is. It should be firm and very elastic. But this takes a bit of practice.


Take out the liver, deglaze the pan with a shot of Brandy. Take out the bay leaf and the thyme and throw away. But everything into a blender and add the cream and the rest of the butter. Blend the mixture until smooth.
Next put the mixture through a very fine sieve. Do not be lazy and miss this step. It will make the paté very smooth and will take out all the little grainy stuff.

Now you can pour the still liquid paté into whatever kind of container you have available. Put it immediately into the fridge for about 20-30 min. - just long enough for the surface to solidify a bit. If you keep it in the fridge for too long the surface will turn brown.


Now take some extra butter and clarify it i.e. heat it until it dissolves and take of the white froth from the top. Now carefully spoon the clear butter over the paté and put it in the fridge again. It should be ready to eat after about 3-4 hours in the fridge and it will keep for a couple of days. Try the Italian Bread recipe below for a perfect combination.


Roberto's Italian Bread Recipe

A while ago we bought some stunning photographs of Joburg CBD from Kutlwano Moagi which we will finally be able to put on the wall when we move to our new house. Have a look:

These photographs are actually quite large (1.1m x 1.1.m) and we wanted to get them framed. We randomly picked a gallery close to where we live and there we met Roberto who runs a gallery on Jan Smuts.

He is an Italian gentiluomo and while we were chatting we he mentioned that he likes to cook and to bake bread. He gave us a sample of his bread and next time we met to pick up the pictures he gave me the recipe. Both the recipe and the framing is excellent and I am sure you get both if you visit him.

I am still trying to figure out how to execute his recipe properly but I wanted to share it and show my first results.

The ingredients could not be more simple:
1.7 kg of flour (any kind)
1 Paket of dry yeast
2 Tbl Sp Salt
some sugar
Water
some additional Flour for the baking tray

Actually I added the sugar to this list. It was not in Roberto's original recipe.

Ok, now here is what you do:
Take some warm water and dissolve the yeast with some sugar and a couple of spoons of flour. Wait until you get some bubbles on the water. In the meantime get a large bowl and put the flour in it.


Pour the water with the yeast into the bowl. Knead the dough a bit. Dissolve the salt in another big cup of water and add it to the dough.

Now you have to knead the dough for a couple of minutes. Probably not more than 5. Add more water or flour as required. You will feel that the dough will come off the bowl and it will not be sticky anymore. It should be elastic and firm.

Next cover the bowl with a plastic bag and let the dough rest somewhere warm for about 2-3 hours. After that the dough should look like 'cow shit' - at least that is how Roberto described it. The dough should actually have more bubbles than shown on the picture below so I must be doing something wrong but I am not sure what it is.


Next you pre-heat the oven to 240°C or as hot as you can. Cover the baking tray with some flour and carefully take the dough out of the bowl. I use my fingers to scrape the dough from the sides of the bowl to get it out. Cover the baking tray with a clean cloth and let it rest again for 30 min. When the oven is at 240°C put the tray into the oven and close the door quickly again to not lose the heat. Wait for 20-30 min until the crust of the bread is a dark brown colour and than reduce the heat to 140°C for another 90 minutes.

Here is what the result looks like:
Compared to Roberto's bread my version is too dense and has not risen enough. But it is still delicious! If you want to you can add other ingredients to the dough. Today I made a bread with black olives and ricotta which works quite well.

2013/02/12

Doggie Treats

Here are my two favorite recipes for dog treats. Both very simple. We use the liver treats for training and the other ones for everyday. Preparing those should not be more than 5 min work before you put them in the oven.

Both the liver treats and the oat ones will keep about a week to 10 days in the fridge. You can easily deep freeze them.

Liver Treats - Ingredients
400 gr. Liver (ox liver rules supreme but any other liver will do)
2 Tblsp Flour
2 Tblsp Milk powder
1 Egg

Mix all ingredients in a food processor and bake on a greased baking tray for 15 min at 180 °C.

Oat Treats - Ingredients
250 gr. Oats
250 gr. Wholewheat Brown Flour
2 Tblsp Milk powder
2 Eggs
100 gr. diced almonds (or nuts or some seeds)
100 ml Milk

Mix all ingredients and bake on a greased baking tray for 20 min at 180 °C.

2013/01/03

Tortellini alla panna

I love Tortellini. I think there is no other dish that I have prepared more often in my life than Tortellini alla panna. It is my favourite dish of all time. If you have ever tasted fresh homemade Tortellini you will never want to buy the finished product again. On the other hand if you make everything from scratch it involves a lot of work! 

Filling:
200 gr Parmesan cheese (good quality)
150 gr Mortadella (you can take the SA local, does not have to be the imported stuff)
150 gr Pancetta or Parma ham (I prefer Pancetta! Make sure that you fry the pancetta for a couple of minutes in a pan)
Salt, Pepper, Nutmeg
1 egg

Put everything in a food processor. Filling complete!

Pasta Dough:
3 eggs
200 gr Semolina
100 gr Cake Flour
2 Tbsp Olive oil
Some salt

Knead the dough and use more flour if you need until it does not stick. Use pasta machine to get the dough really, really thin. Use a glass or something similar to cut out round discs of dough. Put some of the filling (small teaspoon max) on the disc, wet the edges with some water and fold the disc to a halfmoon. Press edges until they stick. Fold the halfmoon to a Tortellini. Sprinkle some flour on the Tortellini and keep in the fridge until you are ready to cook them.

Cook the Tortellini in a big pot for about 5 minutes (should be ready once they come to the surface of the water) and toss them into the pan with the sauce.

Sauce:
Some slices of pancetta (or other bacon)
200 gr of heavy cream
100 gr parmesan
Salt, pepper, olive oil

Fry pancetta with some olive oil until crispy. Take out of pan. Pour heavy cream into pan. In goes the parmesan cheese and the Tortellini. Season with Salt, Pepper. Serve with the crisp bacon on top. Done!

2012/12/28

Pizza dough

After reading a lot and even more trial and error I think I found my perfect recipe for pizza dough. It is a cold yeast dough i.e. you use more yeast than usual the dough will rise in the fridge. Here are the ingredients for 3-4 large pizze:

30 gr fresh yeast
500 gr flour (cake flour)
250 ml warm water
6-10 Tbsp Olive oil
Salt, pinch of sugar

Here is what you do: Dissolve yeast in warm water. Add the other ingredients and use additional oil/water or flour until you get the right consistency of the dough. It should not stick to your fingers and should be very flexible. You will probably have to knead the dough for a couple of minutes (5-10 min).

Put the dought in a bowl, cover with a damp cloth and put in the fridge and allow the dough to rise. After a couple of hours cut the dough into 3-4 equal portions and knead again for a couple of minutes. Put separate pieces in fridge again.

After 2 more hours you can use the dough for your pizza. It will keep in the fridge for a couple of days.

Now I just have to convince the landlord to let me build that wood-fired pizza oven in the garden ...